
Halloween decor DIY instantly converts any ordinary room into a cohesive, layered haunted display that store-bought kits never replicate. Handmade decorations add texture, scale, and intentionality that mass-produced props physically cannot deliver. This guide gives you 24 specific, actionable projects — from outdoor graveyard scenes to indoor vignettes — with exact materials, measurements, and placement rules for every one. Start with the three foundation steps before you touch a single craft supply.
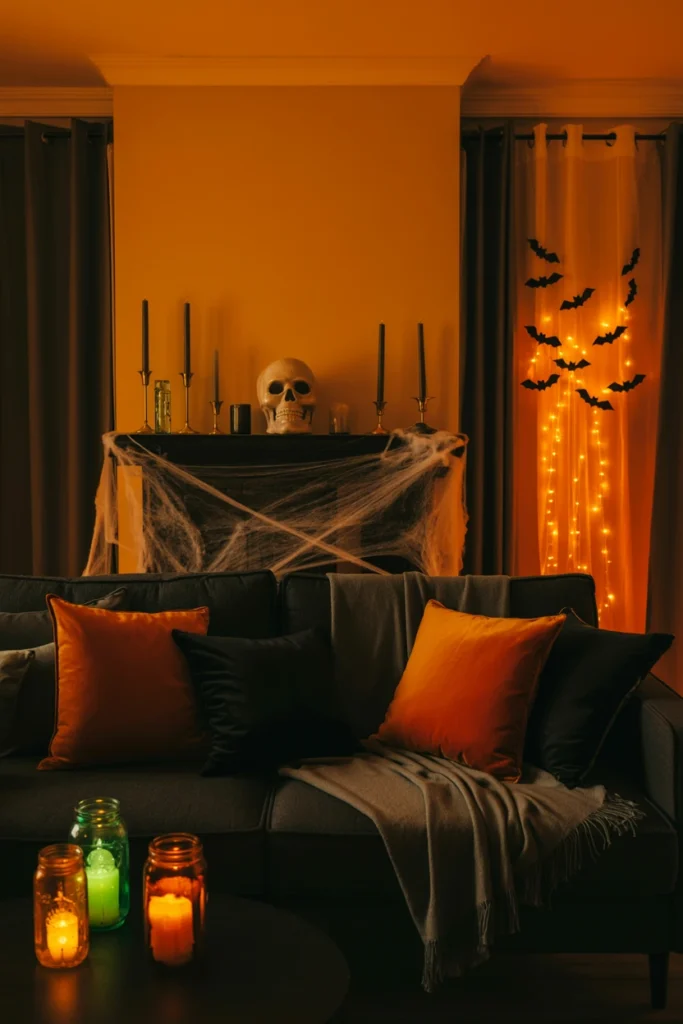
Before You Begin: 3 Foundation Steps for Halloween DIY Decor
These three steps prevent the most damaging problem with homemade halloween decorations — a cluttered, random-looking display that lacks visual cohesion. Skipping any one of them costs you hours of rearranging after the fact. Complete all three before purchasing or making a single item.
1. Establish a Color Palette Before Buying Any Supplies
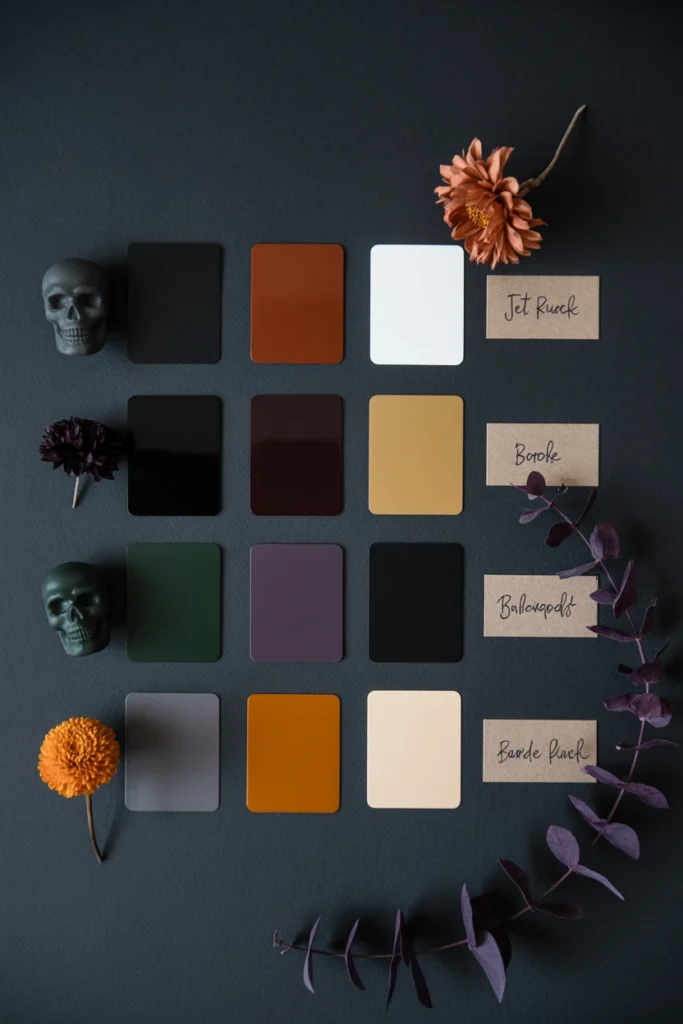
A mismatched halloween color scheme destroys the cohesive spooky effect before a single prop is placed. When orange, purple, green, and black compete at equal visual weight, the display reads as chaotic rather than intentional. A defined three-color maximum makes every halloween decor diy project look coordinated and deliberate across every zone.
Choose a dominant color (60%), an accent color (30%), and a neutral (10%) — the most effective Halloween palette is black dominant, deep orange accent, and bone white neutral. Apply this ratio consistently when selecting ribbon, fabric, paint, and props so every handmade item you produce reinforces the same visual language. Every decoration you buy or make from this point forward must contain at least one of your three chosen colors.
| Palette Style | Dominant (60%) | Accent (30%) | Neutral (10%) |
| Classic Haunted | Black | Deep Orange | Bone White |
| Gothic Elegant | Black | Burgundy | Antique Gold |
| Witch Aesthetic | Forest Green | Purple | Matte Black |
| Modern Minimal | Charcoal Gray | Burnt Orange | Cream |
2. Map Your Decor Zones to Avoid Visual Clutter
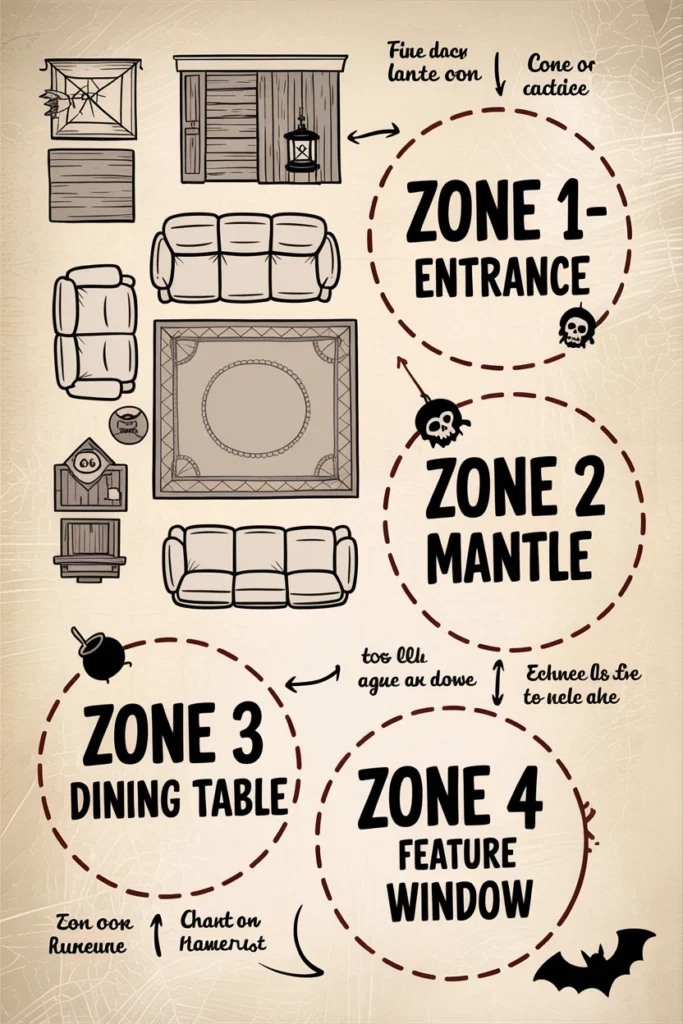
Spreading halloween diy decorations randomly across every surface creates visual noise that cancels the spooky effect entirely. Each zone without a clear anchor piece loses its impact and makes the overall display look unplanned and accidentally assembled. A four-zone approach creates deliberate focal points that guide the eye through the space and make every individual project read as part of a larger design.
Identify exactly four decor zones before placing a single item — entrance, main focal point (fireplace or console table), dining area, and one feature window. Each zone gets one hero piece plus two to three supporting elements, and every other surface stays completely clear. Zone discipline eliminates the urge to fill every available shelf and produces a display that reads as intentional rather than accumulated over time.
| Zone | Hero Piece | Supporting Elements | Max Items |
| Entrance | Wreath or lantern | Door mat, potted black plant | 4 |
| Mantle/Console | Skull arrangement or cauldron | Candles, cobwebs, jars | 6 |
| Dining Table | Potion bottle centerpiece | Small pumpkins, black ribbon | 5 |
| Feature Window | Silhouette cutout | String lights, sheer curtain | 3 |
3. Build a Materials List Around What You Already Own
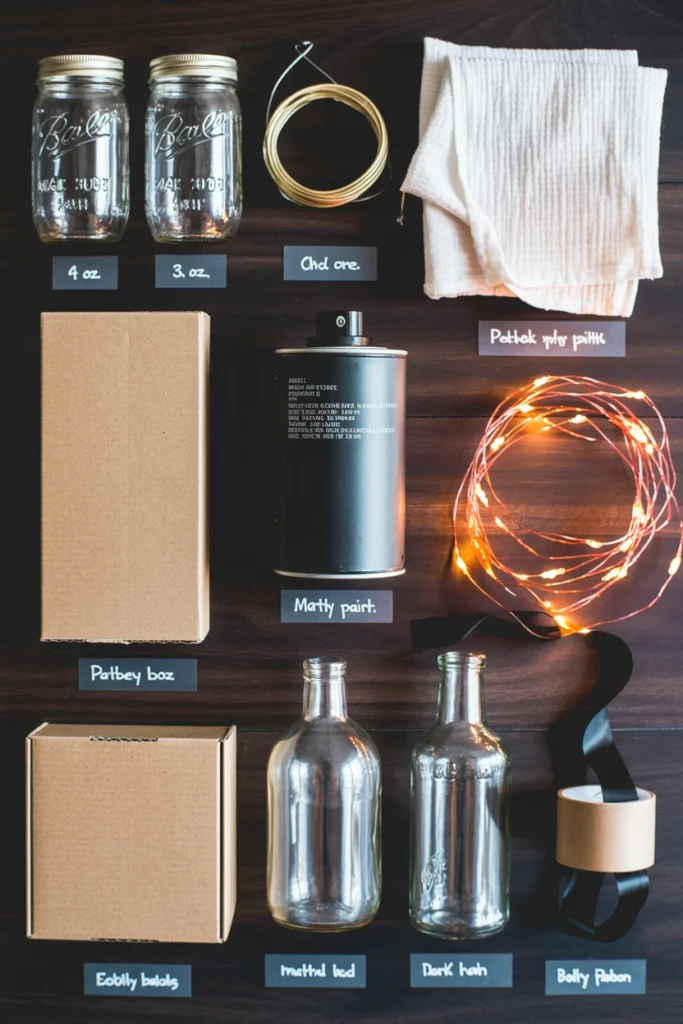
Buying duplicate materials wastes money and clutters the workspace before a single halloween diy project starts. Most households already own 40–60% of the materials needed for effective diy halloween crafts. A full home inventory audit before opening any browser or driving to a store reduces supply costs by an average of $15–$30 per project session.
Walk every room and pull these specific items before shopping: mason jars, 18-gauge wire, old white fabric or sheets, black spray paint, cardboard, string lights, and glass bottles of any size. Check the recycling bin for cardboard boxes, paper towel rolls, and glass bottles — all three appear as core materials in at least six of the 24 projects in this guide. Every material sourced from home eliminates a store trip and adds authentic texture that new, identical materials from a craft store cannot replicate.
| Common Household Item | Halloween DIY Application |
| Mason jar (any size) | Potion bottle, glowing lantern, candle holder |
| Cardboard box | Tombstone base, window silhouette, coffin prop |
| Old white bedsheet or pillowcase | Ghost figure, draped table covering, cheesecloth substitute |
| String lights (any existing color) | Window glow effect, mantle lighting base layer |
Outdoor Halloween DIY Decorations That Stop Foot Traffic
Outdoor displays must work at 25–30 feet of viewing distance, in daylight and after dark. Each spooky diy halloween decoration below is calibrated for street-level impact — not tabletop scale — and holds its effect in wind, rain, and full sun.
4. Create a Graveyard Scene Using Foam Tombstones
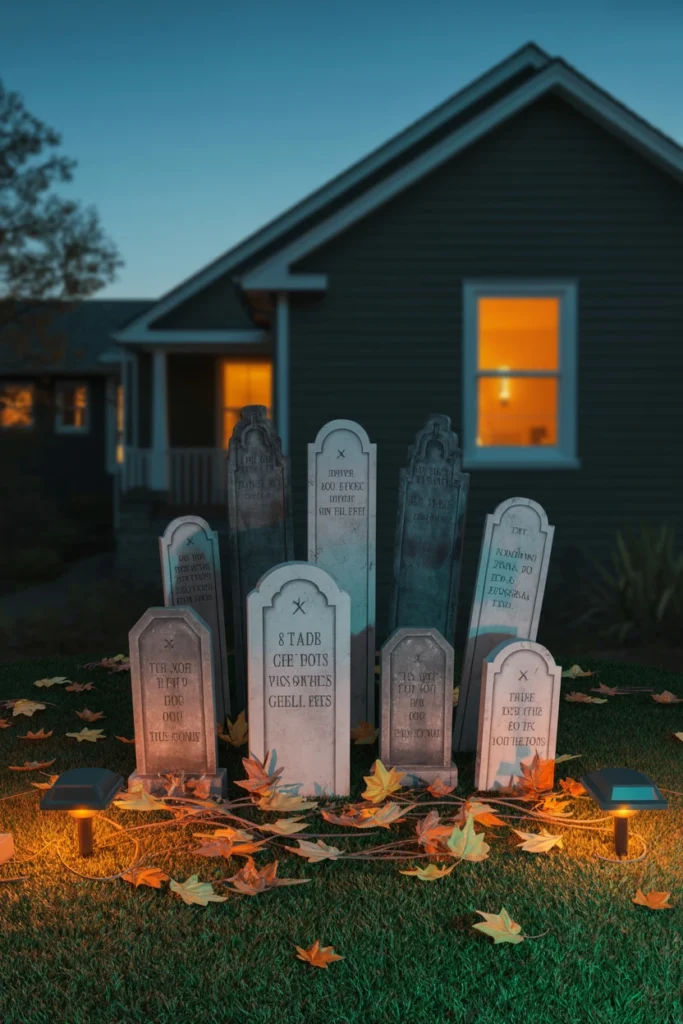
A front yard without a single dominant focal anchor reads as underdecorated regardless of how many small props are scattered across the grass. Individual items placed without grouping lose all impact when viewed from the sidewalk at 25 feet. A clustered graveyard scene creates one strong visual statement that registers instantly from the street and anchors every other outdoor element around it.
Cut tombstone shapes from 2-inch thick foam insulation board using a utility knife — Home Depot sells 4×8 foot sheets for under $12, which yields 8–10 tombstones per sheet. Carve epitaphs with a pencil tip, spray-paint gray, then dry-brush white paint over raised lettering for an aged stone effect that holds up in rain. Group 5–7 tombstones in a tight cluster rather than spreading them individually — a cluster reads as a deliberate scene while individual tombstones read as forgotten props.
| Tombstone Height | Placement Row | Visual Role at Street Distance |
| 8–12 inches | Front row, closest to sidewalk | Ground-level texture and fill |
| 18–24 inches | Second row, mid-cluster | Core body of the graveyard scene |
| 30–36 inches | Third row, mid-yard | Height and drama anchor |
| 40–48 inches | Back row, near house foundation | Maximum impact statement piece |
5. Hang Ghostly Figures From Trees With Cheesecloth
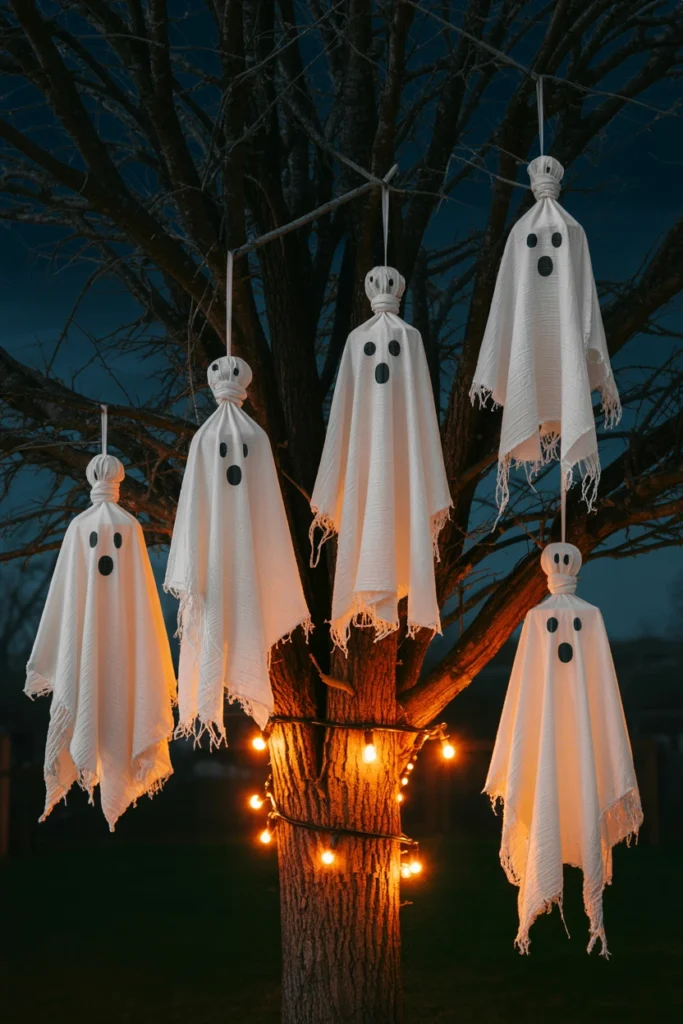
Empty tree branches during Halloween season are the most visible missed display opportunity in any front yard. Unanchored yard props on the ground read as low-effort while vertical hanging elements create three-dimensional presence that ground props physically cannot achieve. Hanging cheesecloth ghosts add height, movement in wind, and nighttime glow that makes the entire outdoor display read as deliberately layered.
Form each ghost by stuffing a white plastic shopping bag with newspaper or more plastic bags, wrapping it in a 36×36 inch square of cheesecloth tied at the neck with white twine — total material cost per ghost is under $1.50. Cut the lower cheesecloth fabric into 6–8 ragged vertical strips and stretch each strip slightly before tying off to create the wispy trailing effect. Hang in a cluster of five on one tree at varying heights between 4 and 8 feet — a five-ghost cluster on one tree creates dramatically more impact than one ghost spread across five different trees.
| Ghost Size | Cheesecloth Square | Ideal Hanging Height |
| Mini (child-scale) | 18×18 inch | 4–5 feet from ground |
| Standard | 36×36 inch | 6–7 feet from ground |
| Large statement | 48×48 inch | 8–9 feet from ground |
| Ground dweller (unstaked) | 24×24 inch draped flat | Ground level at root base |
6. Place Silhouette Cutouts in Lit Windows for Instant Drama
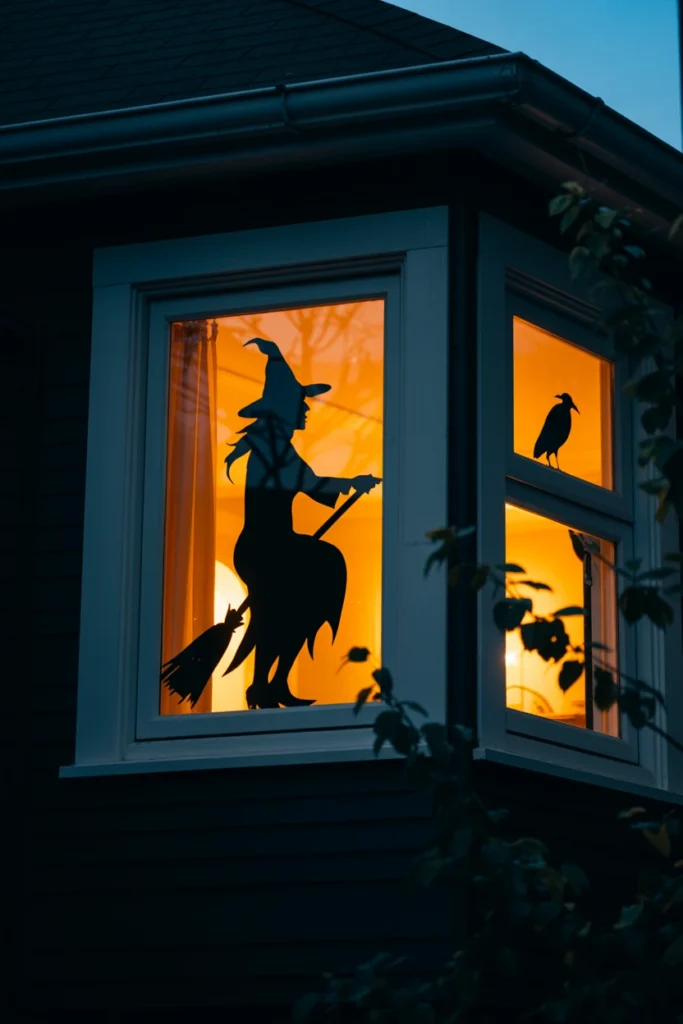
A lit window without a silhouette is a missed display element visible to every person approaching your house from any direction. Plain bright windows read as ordinary at night while every other element of the outdoor display works to create atmosphere. Window silhouettes cost zero dollars in materials, require no tools, and produce the highest contrast Halloween effect visible from the street.
Trace witch, cat, raven, or bare tree shapes onto black poster board or cardboard and cut with sharp scissors — use a free projector app on your phone to scale any image to the exact window width before tracing onto the board. Tape the cutout flat against the inside of the window glass so the room’s interior lighting backlights the shape from behind, creating a sharp black silhouette against the glowing window. Switch the interior light source to a warm amber or orange bulb to transform the window glow from white to a spooky amber that reads as fire-lit from outside.
| Silhouette Shape | Impact at 25 Feet | Best Window Type |
| Witch on broomstick | Maximum — instantly recognizable profile | Wide horizontal windows, 24+ inches |
| Black cat arched back | High — strong classic Halloween outline | Any window, all sizes |
| Raven on branch | High — elegant, detailed, architectural | Tall narrow windows |
| Haunted bare tree | Medium-high — fills and frames large glass | Large picture windows, sliding doors |
7. Build a Scarecrow Display Using Stuffed Old Clothing
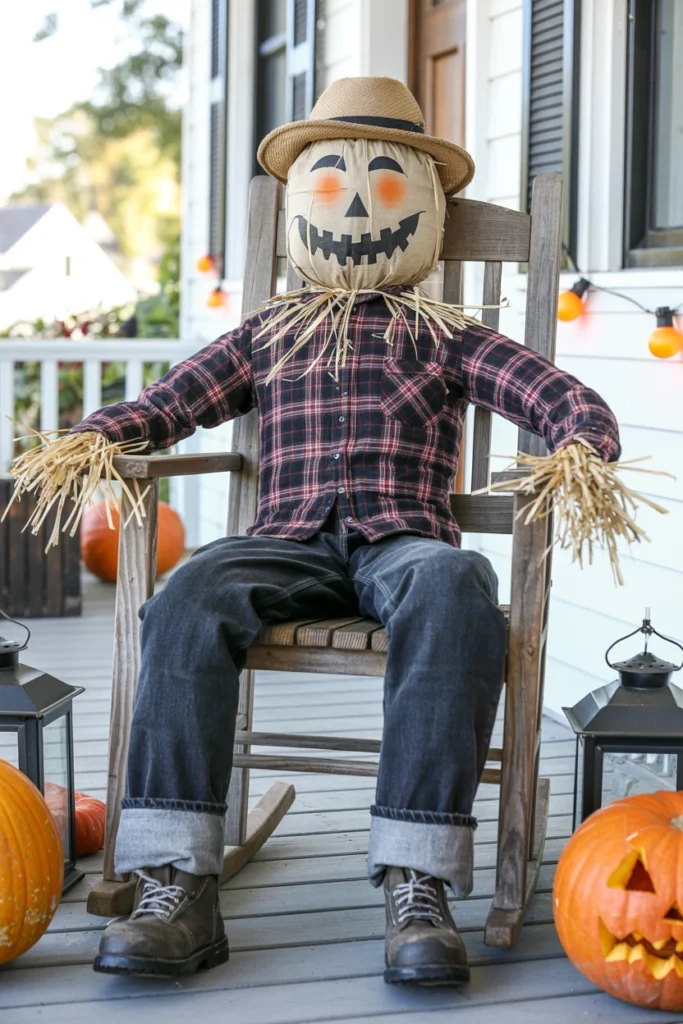
A front porch without a three-dimensional dimensional prop collapses into a flat, two-dimensional display regardless of how many smaller decorations surround it. Flat decorations require lighting to work after dark and lose their effect in full daylight. A stuffed scarecrow figure creates physical presence that works in bright daylight from 30 feet away and requires zero electrical connection to hold its effect.
Stuff an old flannel shirt and pair of jeans with plastic shopping bags or crumpled newspaper until every limb holds its shape when seated, then zip-tie shirt cuffs to jeans ankles at the joints to lock the pose permanently. Sew or tie a burlap sack stuffed firmly with newspaper as the head, paint on a face with outdoor-rated black acrylic, and attach a straw hat with a single straight pin through the crown into the burlap. Seat the figure in a porch chair rather than staking it upright — seated figures are stable in 30+ mph wind without ground anchors and take under five minutes to reposition if the display needs adjustment.
| Scarecrow Style | Core Materials Needed | Assembly Time |
| Classic porch sitter | Flannel shirt, jeans, burlap sack, straw hat | 45 minutes |
| Witch scarecrow | Black dress, pointed hat, green painted face | 30 minutes |
| Zombie variation | Torn distressed clothing, black and red paint | 60 minutes |
| Headless variant | Button-up shirt stuffed high, no head added | 20 minutes |
Homemade Halloween Decorations That Transform Any Indoor Room
Indoor homemade halloween decorations must perform in daylight under ambient room light and at night under dimmed or lamp-only lighting. Each project below produces visible atmosphere under both conditions without relying on darkness to hide poor execution.
8. Layer Black and Orange Textiles for Instant Seasonal Atmosphere
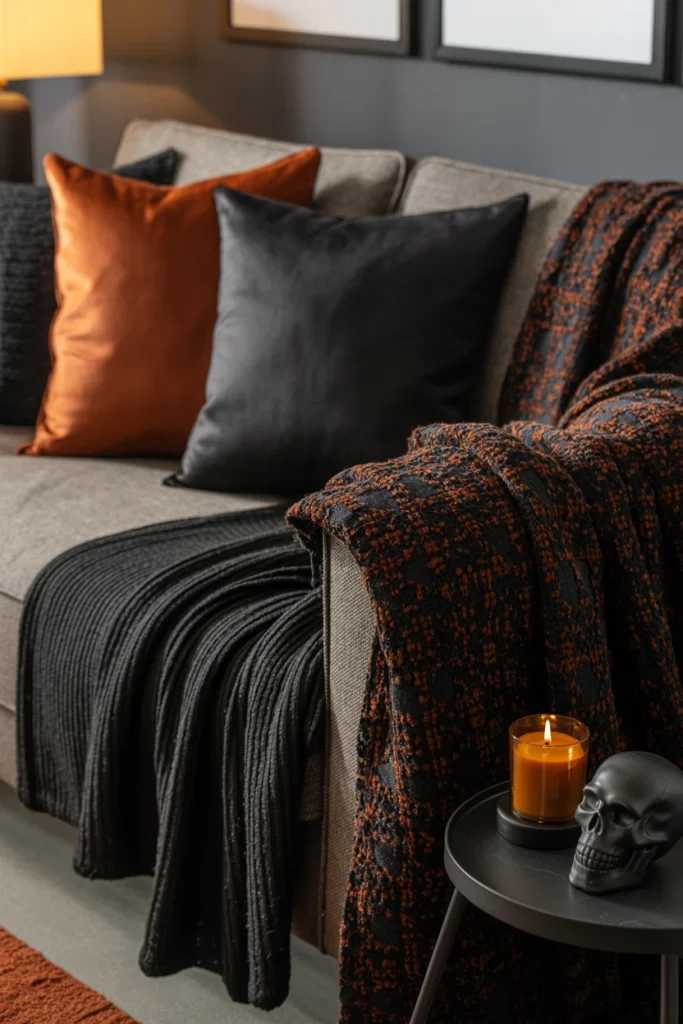
A room decorated only with props and no textile changes reads as decorated rather than transformed — the underlying color scheme of everyday furniture defeats every Halloween prop placed on top of it. Hard props without soft layering create a display that looks temporary rather than designed into the space. Textile swaps are the single fastest way to shift a room’s entire color temperature toward a Halloween palette without moving a single piece of furniture.
Replace existing throw pillow covers with black and deep orange versions — standard 20×20 inch covers fit the majority of sofa pillows sold in the US and UK and cost $4–$7 each at IKEA or Amazon. Add one black throw blanket draped asymmetrically across a single sofa arm — never centered and never folded neatly — so the textile reads as casually placed rather than staged. Textile changes install in under 10 minutes and reverse in under 10 minutes, making them the highest-value, zero-damage halloween diy option for renters and apartment dwellers.
| Textile Item | Swap Target | Approximate Cost |
| Throw pillow covers (20×20 inch) | Black or deep orange covers | $4–$7 each |
| Table runner | Black velvet or natural burlap | $8–$14 |
| Sofa throw blanket | Matte black chunky knit | $12–$20 |
| Window sheer panel | Black or deep charcoal voile | $15–$25 per panel |
9. Arrange Your Fireplace Mantle as a Haunted Focal Point
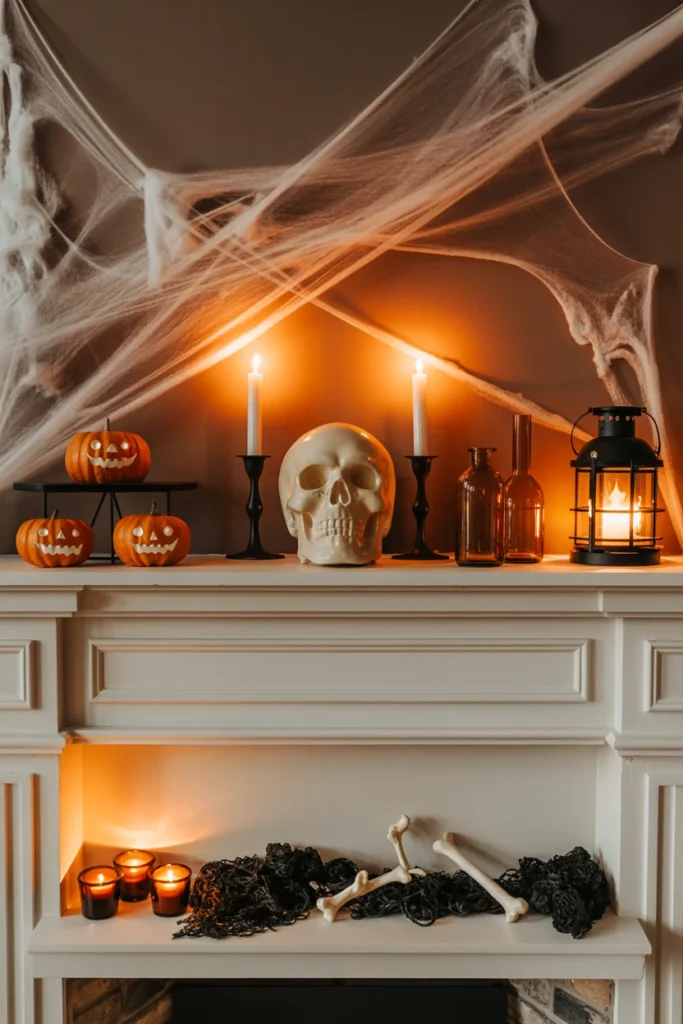
An unstyled mantle during Halloween season is the single most wasted display surface in any home with one. Most homeowners add one or two random props and leave the remaining 5–6 feet of mantle space completely empty. A fully dressed mantle creates the strongest indoor Halloween focal point available without requiring any wall damage, drilling, or permanent installation.
Anchor the mantle arrangement with one central hero piece at least 14 inches tall — a large skull, a cluster of black candlesticks, or a carved pumpkin — then build outward with decreasing heights toward each end. Layer fake cobwebs loosely across the back wall of the mantle at 2–3 inch depth before placing any props, so the webs appear to grow organically around the objects rather than sitting in front of them. A finished halloween mantle must contain exactly three height levels — tall (12–18 inches), medium (6–10 inches), and low (2–4 inches) — to create the layered depth that reads as professionally styled.
| Height Level | Example Props | Item Count Per Level |
| Tall (12–18 inches) | Black candlesticks, large skull, hanging lantern | 1–2 pieces maximum |
| Medium (6–10 inches) | Mini pumpkins, potion bottles, small dark frames | 3–4 pieces |
| Low (2–4 inches) | Votive candles, black moss, scattered plastic bones | 5–7 pieces |
| Full-width drape | Stretched cobwebs, black fabric, twig garland | One continuous layer |
10. Group Candles and Skulls Into a Spooky Vignette
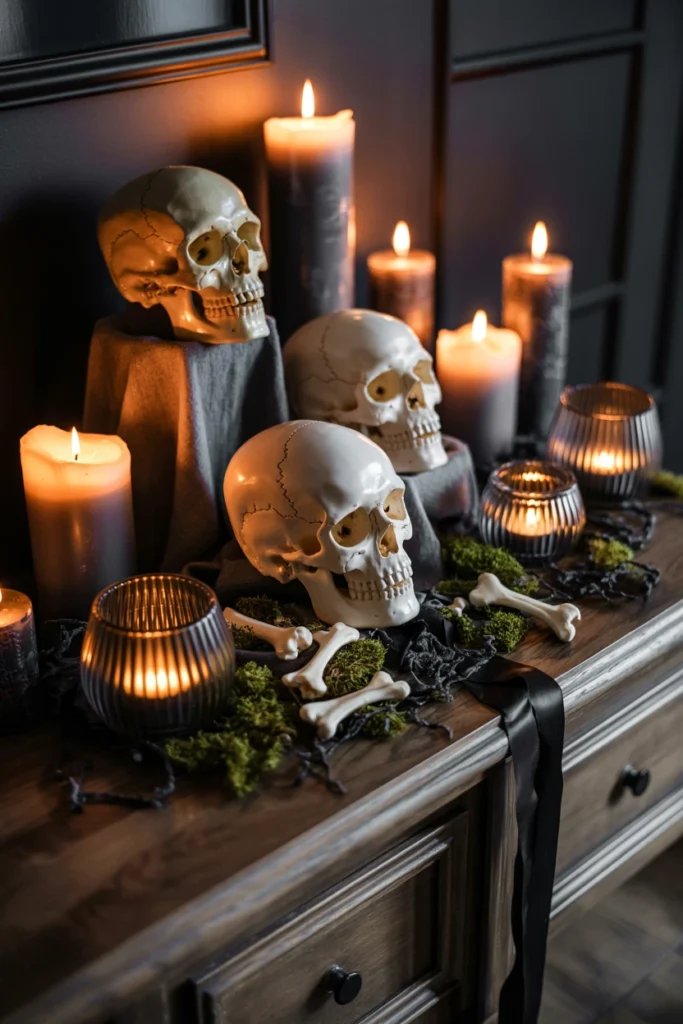
A single candle or a single skull placed alone on a surface has zero visual impact and reads as an afterthought regardless of how high-quality the individual item is. Isolated objects create dead zones in a decor display rather than moments of visual interest. Grouped vignettes direct the eye, create layered depth, and make homemade halloween decorations look intentionally styled rather than randomly positioned.
Arrange skulls in a group of three at heights of 2 inches, 5 inches, and 9 inches using hidden risers — small stacked books or cardboard boxes covered with a black cloth square work perfectly. Surround the skull group with five to seven pillar or taper candles at staggered heights, leaving 2–3 inches of visible breathing room between each element so no two objects touch or overlap. A vignette with one clear tallest point, one clear widest element, and a defined ground layer reads as intentional design rather than a collection of miscellaneous props.
| Vignette Element | Purpose in the Arrangement | Placement Rule |
| Tallest piece (skull/lantern) | Visual anchor — defines the height boundary | Dead center or offset 6 inches from center |
| Mid-height items (candles, jars) | Volume and depth builders | Placed to left and right of the anchor piece |
| Low filler (moss, bones, coins) | Ground-level texture and base weight | Scattered across the front of all taller items |
| Single trailing element | Creates asymmetry and natural feel | One piece extends beyond the group edge by 3–4 inches |
11. Repurpose Mason Jars Into Glowing Potion Bottle Displays
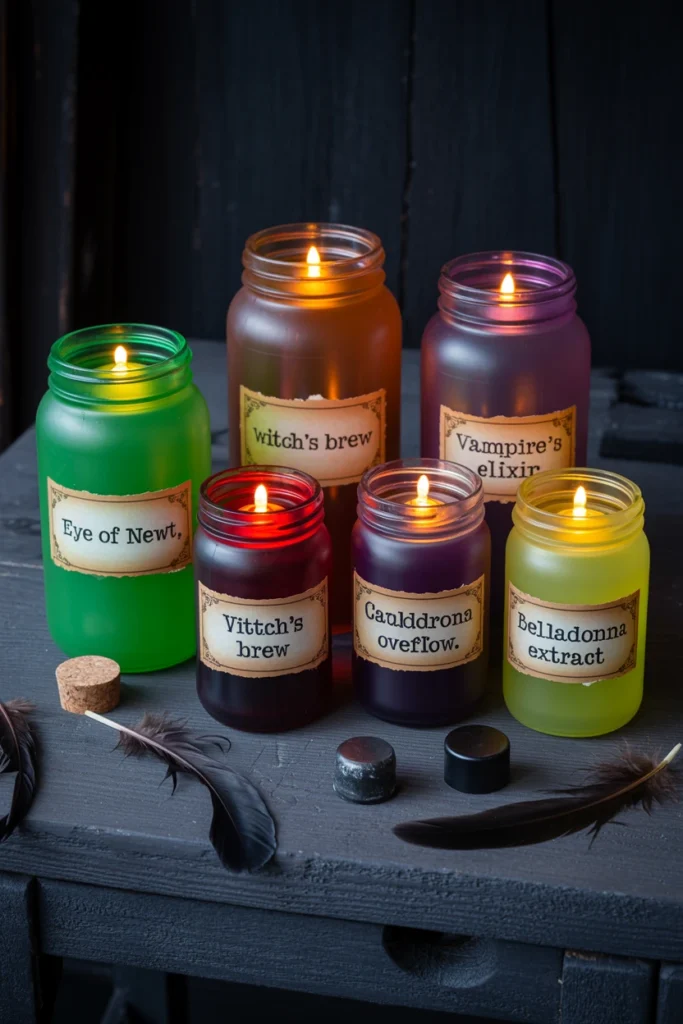
Empty mason jars left undecorated represent the cheapest and fastest halloween decor diy opportunity sitting in any kitchen cabinet right now. Generic clear glass containers without color or labeling read as kitchen storage and actively undermine the Halloween atmosphere around them. Transformed potion bottles cost under $3 per jar and create high-impact glowing clusters that work on any surface in any room.
Mix Mod Podge with food coloring at a ratio of 4 parts Mod Podge to 1 part coloring and paint the outside of each jar with one thin coat — green, amber, and deep red produce the most convincing potion bottle effect. Allow 2 hours of drying time, then insert a battery-operated tea light inside and seal the lid loosely. Print potion labels in an aged Gothic font at 2×1.5 inch size, cut and crinkle them slightly before taping to the glass for an authentic weathered look, then group jars in a cluster of five using varied jar sizes from 4-ounce to 32-ounce.
| Jar Size | Color Tint Mix | Label Theme |
| 4 oz jelly jar | Bright green (5 drops green coloring) | “Eye of Newt” |
| 8 oz half-pint | Deep amber (3 drops yellow, 1 drop red) | “Witch’s Brew” |
| 16 oz pint | Blood red (6 drops red coloring) | “Vampire’s Elixir” |
| 32 oz quart | Toxic purple (3 drops blue, 2 drops red) | “Cauldron Overflow” |
Spooky DIY Halloween Lighting Effects for Eerie Atmosphere
Lighting is the single element that converts a daytime craft display into a genuinely atmospheric nighttime experience. Every project below produces measurable atmosphere change in a room with the overhead lighting left on — these are not darkness-dependent effects.
12. Install Orange String Lights Behind Sheer Curtains for Glow
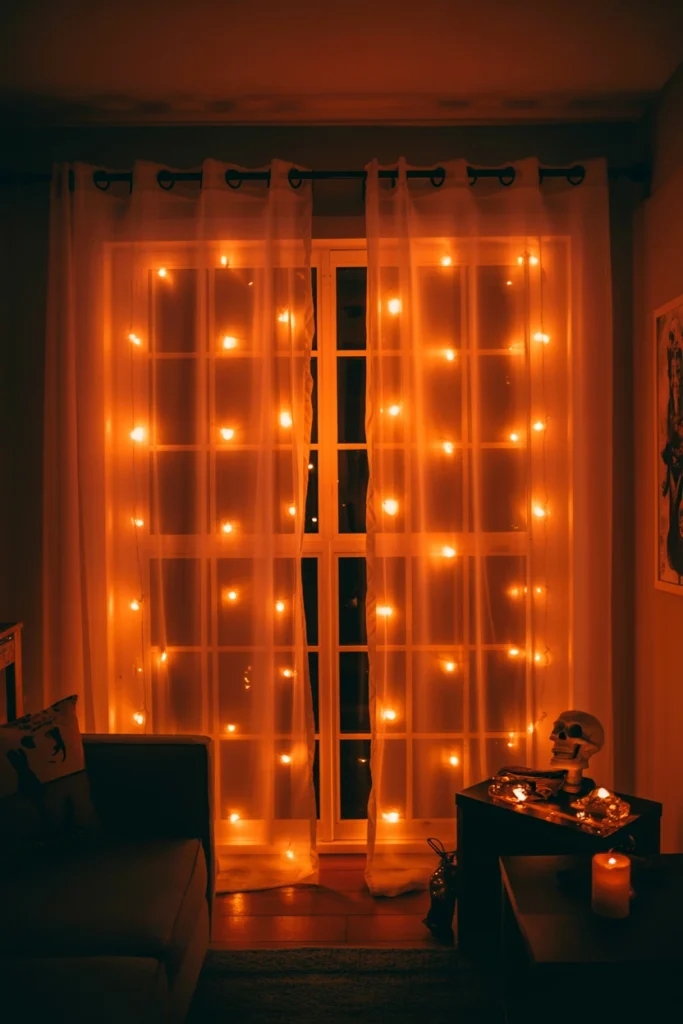
A room with only white overhead lighting never achieves a genuinely spooky atmosphere regardless of how many props are arranged within it. White overhead light flattens every shadow that creates the halloween depth and dimension that makes a display feel immersive rather than decorative. Warm orange string light layered behind existing fabric completely transforms the quality of light in the room without touching a single switch or outlet.
Weave a 20-foot strand of orange LED string lights through the existing rod pocket of any sheer curtain panel without removing the curtain from the rod — the threading takes under three minutes per panel. Push the lights 3–4 inches behind the curtain face so the fabric diffuses the individual bulb dots into a smooth glowing wash rather than a dotted outline. A single $9 strand of orange LED lights at the curtain produces more atmospheric transformation than $50 worth of halloween props placed anywhere else in the same room.
| Strand Length | Window Coverage | Best Room Application |
| 10 feet | Small single window, under 24 inches wide | Bedroom, bathroom, hallway |
| 20 feet | Standard double window, 36–48 inches wide | Living room, dining room |
| 33 feet | Large picture window or sliding door | Great room, open-plan entry |
| 50 feet | Full room perimeter above window line | Party space, finished basement |
13. Use Battery Candles Inside Carved Pumpkins for Safe Flicker
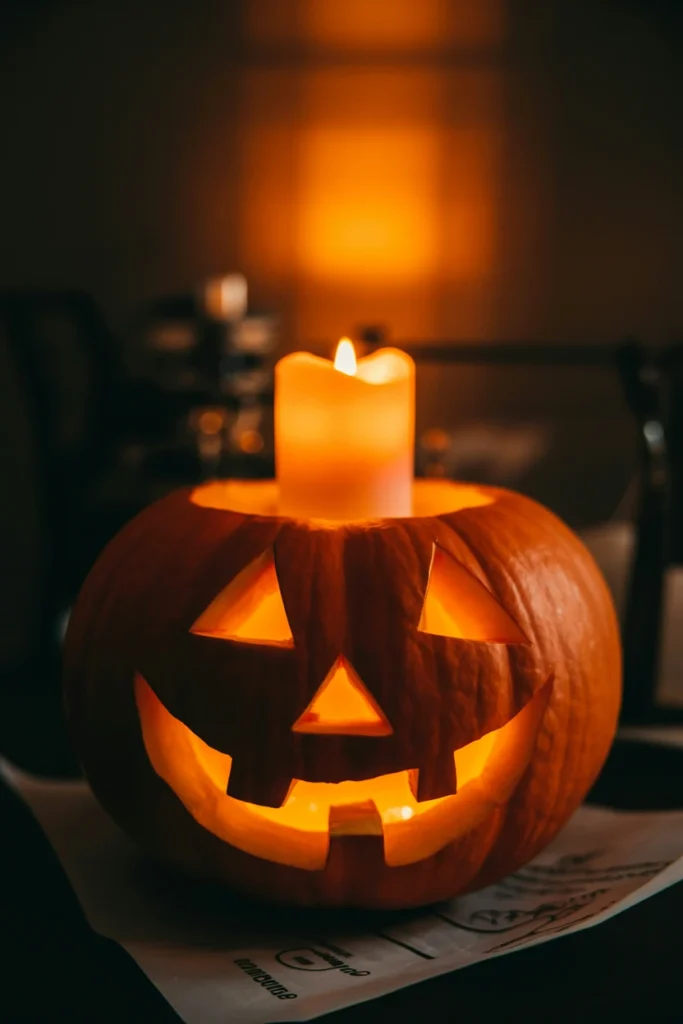
Real candles inside carved pumpkins eliminate the option of unattended display in any room and create a legitimate fire hazard within minutes of the flame touching a dry inner wall. Exposed flames inside carved pumpkins ignite the interior pumpkin flesh in under 20 minutes of continuous burning when the wick contacts the carved edge. Battery-operated flickering candles deliver identical visual effect with zero fire risk and eight times the total display longevity before any battery change is needed.
Use a 3×4 inch battery-operated pillar candle with a flickering mode rather than steady-on — the irregular flicker replicates the organic flame movement that makes the pumpkin glow look alive rather than electric. Place the battery candle on a small square of aluminum foil inside the pumpkin to reflect maximum light upward through the carved design and intensify the external glow. Position the candle 2 inches off-center inside the pumpkin rather than perfectly centered — off-center placement creates asymmetric shadow patterns through the carving that read as more organic and dramatically more realistic.
| Battery Candle Size | Matching Pumpkin Diameter | Estimated Battery Life |
| 2×3 inch votive-style | Mini pumpkins under 6 inches diameter | 40–50 hours |
| 3×4 inch standard pillar | Medium pumpkin 8–12 inches diameter | 80–100 hours |
| 4×6 inch large pillar | Large pumpkin 14–18 inches diameter | 100–150 hours |
| 6-inch tall taper style | Tall elongated pumpkins, any diameter | 60–80 hours |
14. Add Black Light Bulbs to Transform Fluorescent Decor
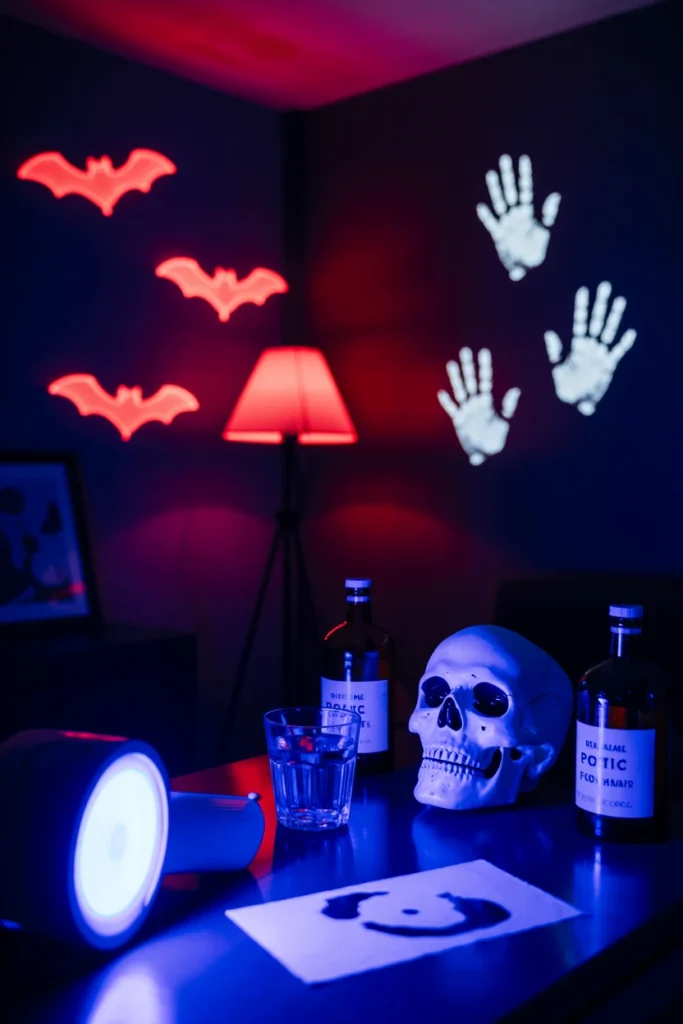
Standard warm or daylight bulbs neutralize the effect of fluorescent halloween paint and neon-reactive materials so completely that painted props in ordinary light look identical to unpainted ones. Every white, neon, or fluorescent material in a room lit by standard bulbs reads as ordinary daylight color with zero halloween effect. A single black light bulb replacing one standard lamp bulb transforms every white or neon element in the same room into a vivid UV-reactive prop simultaneously.
Replace one lamp bulb — not all lamps, only one — with a BR30 base black light bulb (standard E26 socket, $8–$12 at any hardware store) and turn all other room lighting off during display hours. Paint select props with fluorescent white or neon orange acrylic paint ($3–$5 per bottle at craft stores) at least 24 hours before UV exposure so the paint fully cures and reaches maximum UV reactivity. The single most effective black light technique in any room is painting handprints on one wall with fluorescent white paint — completely invisible in daylight, dramatically glowing under UV at night.
| Material | UV Glow Result | Preparation Needed |
| Fluorescent white paint on props | Brilliant blue-white glow | 1 coat, 24-hour full cure |
| Neon orange paint on bats or cutouts | Vivid orange-red glow | 2 coats for maximum intensity |
| White paper, cardstock, labels | Natural fluorescent blue-white | Zero prep — reacts immediately |
| Tonic water in a clear glass | Glowing blue from quinine reaction | None — instant, no prep |
15. Create a Fog Effect Using Dry Ice in a Cauldron
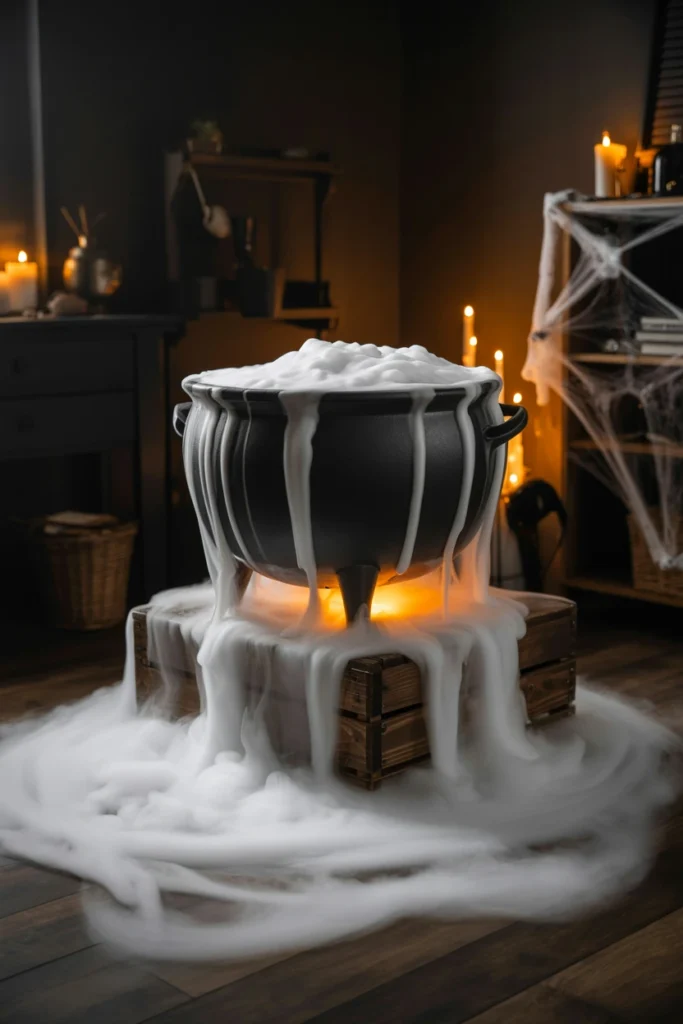
A halloween display without a ground-level fog effect misses the single most atmospheric physical element available at under $15 in total cost. Every lighting effect above operates at eye level or higher — fog fills the floor plane and creates dimensional depth that no prop or light source achieves from above. Ground-level fog makes every surrounding decoration read as more dramatic and makes the entire room feel genuinely immersive rather than merely decorated.
Place 5–10 pounds of dry ice (available at most grocery stores, $1–$3 per pound) in a large black plastic cauldron and pour hot tap water — not boiling — over it to initiate the fog reaction immediately. Elevate the cauldron 6–8 inches off the floor on a hidden box or crate so the fog rolls visibly over the rim and across the floor rather than pooling invisibly inside the container at ground level. Never handle dry ice without insulated gloves, and never use more than 10 pounds in a room under 200 square feet — in well-ventilated spaces and outdoors, the CO2 dissipates completely within seconds of leaving the cauldron.
| Dry Ice Amount | Active Fog Duration | Floor Coverage Area |
| 5 lbs | 8–12 minutes | 6×6 foot area around cauldron |
| 10 lbs | 15–20 minutes | 10×10 foot area |
| 15 lbs | 25–30 minutes | 15×15 foot area |
| 20 lbs | 40–50 minutes | Full room coverage, 20×20 foot |
Budget Halloween Crafts That Look Professionally Made
Every project in this section uses under $5 in new materials. All four pass the 10-foot test — at 10 feet of viewing distance, none reads as a budget halloween diy craft.
16. Cut Felt Bat Shapes and Arrange Them in a Swarm Pattern
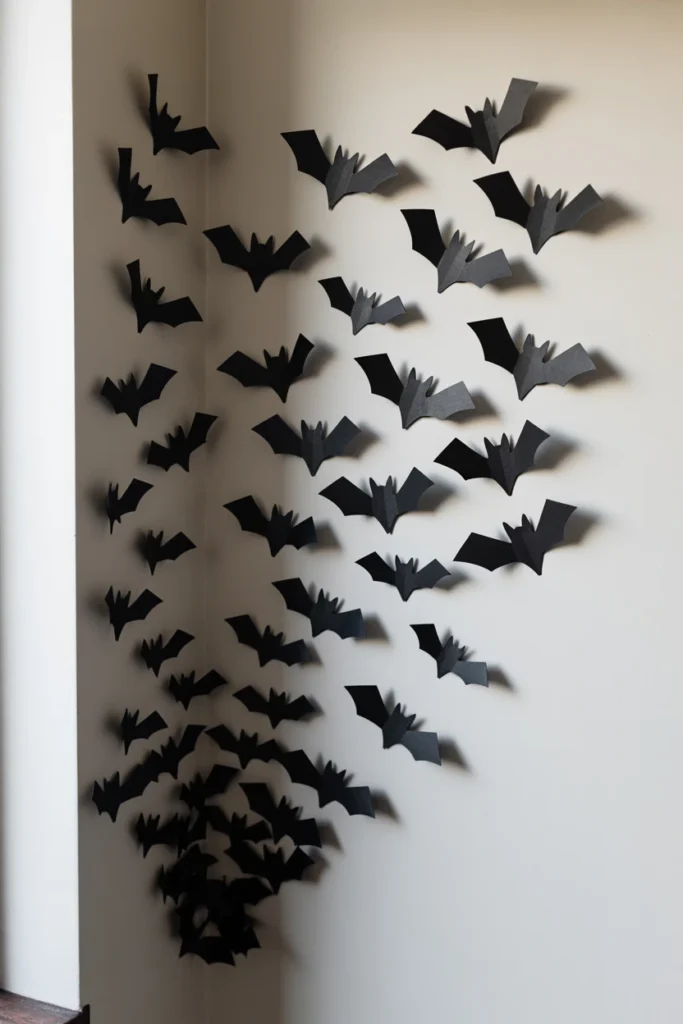
A single bat cutout placed on a wall emphasizes how little Halloween decorating was done rather than creating atmosphere. Individual scattered bats eliminate the only quality that makes bat decorations effective — the collective visual mass of a swarm. A swarm pattern of 25–35 bats arranged as an emerging group triggers a genuine visual reaction that a single element or five individual elements never achieve.
Cut 25–35 bat shapes from black felt sheets — one standard 9×12 inch felt sheet ($0.25–$0.50 at craft stores) yields exactly four bats with 4-inch wingspans when the template is nested efficiently. Fold each bat’s body along the center line so both wings angle upward 15–20 degrees from the fold, creating a three-dimensional curl that casts a small shadow rather than lying completely flat. Arrange the swarm starting at the wall’s bottom corner — low and tightly clustered — then fan upward and outward so the bats read as emerging from a single source point, which creates visual narrative and perceived motion instantly.
| Bat Wingspan | Felt Sheets for 30 Bats | Wall Area Swarm Covers |
| 3-inch wingspan | 6 felt sheets | 12–15 square feet |
| 4-inch wingspan | 8 felt sheets | 18–24 square feet |
| 5-inch wingspan | 10 felt sheets | 25–30 square feet |
| Mixed 3–5 inch sizes | 8 felt sheets | 20–28 square feet |
17. Paint Terracotta Pots Black for Instant Witch Cauldron Props
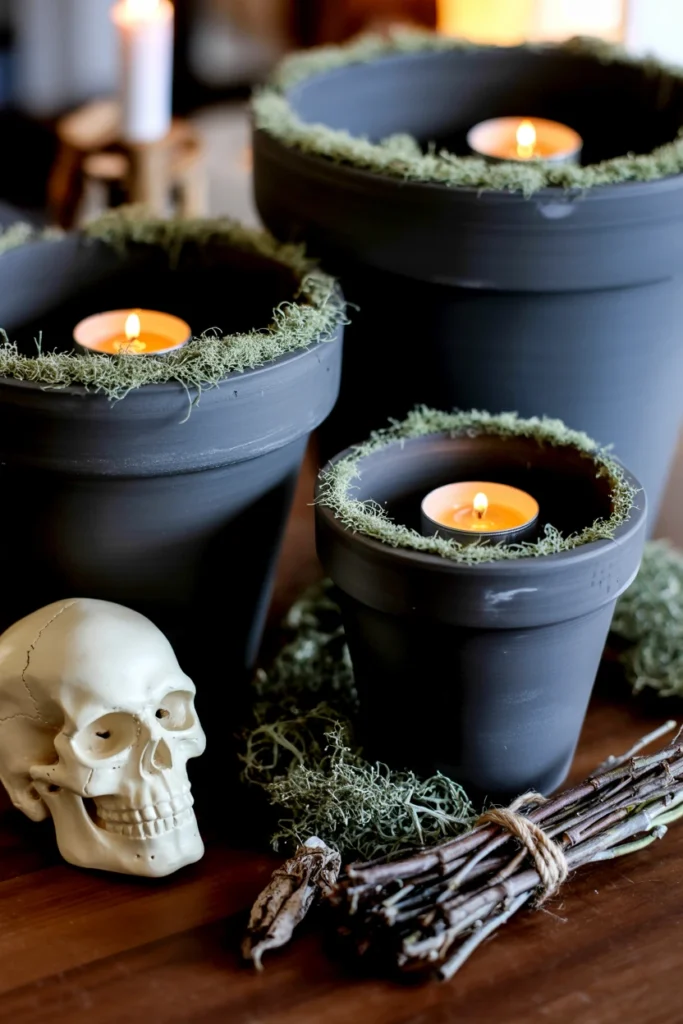
Plain orange terracotta pots placed without modification actively compete with the orange accent color in the Halloween palette instead of supporting the dominant black. Unmodified terracotta reads as garden supply store inventory rather than halloween diy decor, even when surrounded by other spooky elements. Two coats of matte black spray paint completely transform a $1.50 terracotta pot into a convincing witch cauldron prop that costs less than any store-bought equivalent by a factor of ten.
Apply two coats of matte black spray paint — Rust-Oleum 2X Ultra Cover Matte Black at $6 per can covers 12–15 standard pots — to clean, completely dry terracotta and allow 4 hours of cure time between coats. Hot-glue a ring of green or gray artificial moss around the interior rim of each finished pot to simulate the cauldron bubbling effect, then place a battery tea light at the base inside for a glow that shows through the moss. Group three painted pots in graduating sizes — 4-inch, 6-inch, and 8-inch — with a fake skull and a bundle of dried herbs to create a fully staged witch’s workspace vignette that costs under $8 in total new materials.
| Pot Diameter | Best Display Role | Unfinished Cost |
| 4-inch | Mini cauldron accent, table filler | $0.99–$1.50 |
| 6-inch | Standard cauldron, mid-size display | $1.99–$2.50 |
| 8-inch | Hero cauldron, centerpiece anchor | $2.99–$4.00 |
| 10-inch | Large floor cauldron, statement prop | $5.00–$7.00 |
18. Make a Cheesecloth Ghost Using Wire and Fabric Stiffener
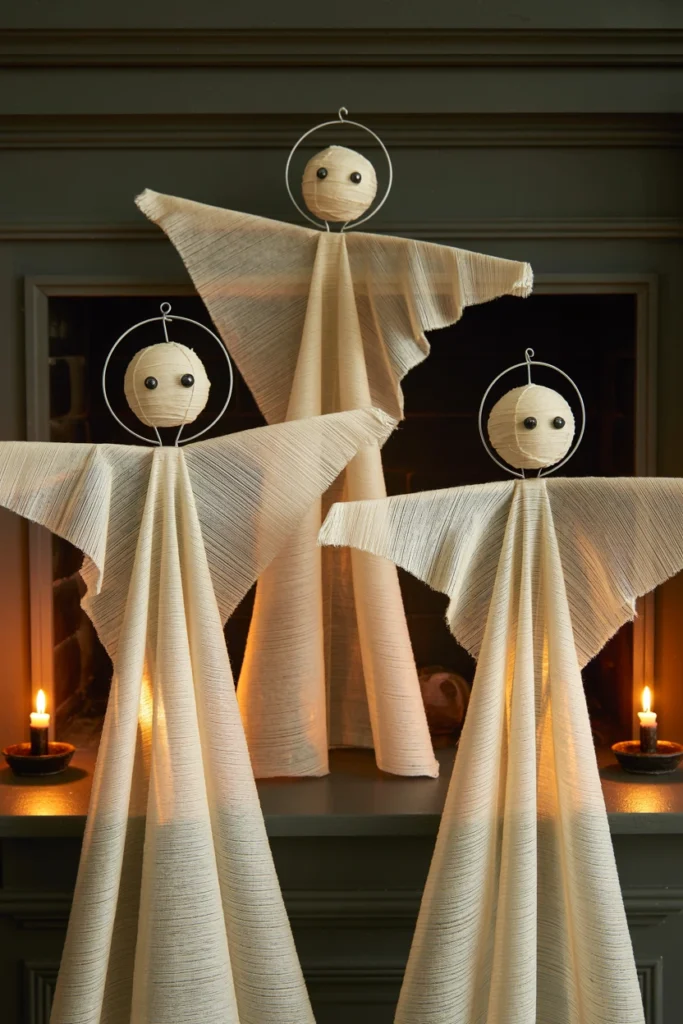
Flat, unstiffened cheesecloth ghosts sag into a limp pile within 24 hours of installation and lose every trace of the hovering, billowing shape that makes them convincing. Drooping fabric figures read as unfinished halloween diy projects rather than completed decorations. Fabric stiffener sets cheesecloth permanently into a billowing held shape that maintains its form for the entire Halloween season without a single adjustment after installation.
Form a round wire frame using 18-gauge floral wire bent into a 12-inch diameter circle as the head structure, then extend a cone-shaped body frame 18 inches below it using additional wire segments crimped to the head ring. Drape cheesecloth over the complete wire frame and saturate it thoroughly with fabric stiffener spray — Stiffy brand at $6–$8 per bottle covers 4–6 standard-size ghosts. Prop the arms outward and tilt the head 10–15 degrees to one side during the full 6–8 hour drying period because whatever position the cheesecloth holds at the moment it fully dries becomes its permanent shape for the entire season.
| Ghost Finished Height | Wire Needed | Cheesecloth Square Needed |
| 12 inches | 24 inches of 18-gauge wire | 18×18 inch |
| 18 inches | 36 inches of wire | 24×24 inch |
| 24 inches | 48 inches of wire | 36×36 inch |
| 36 inches | 72 inches of wire | 48×48 inch |
19. Print and Frame Spooky Victorian Portraits as Wall Art
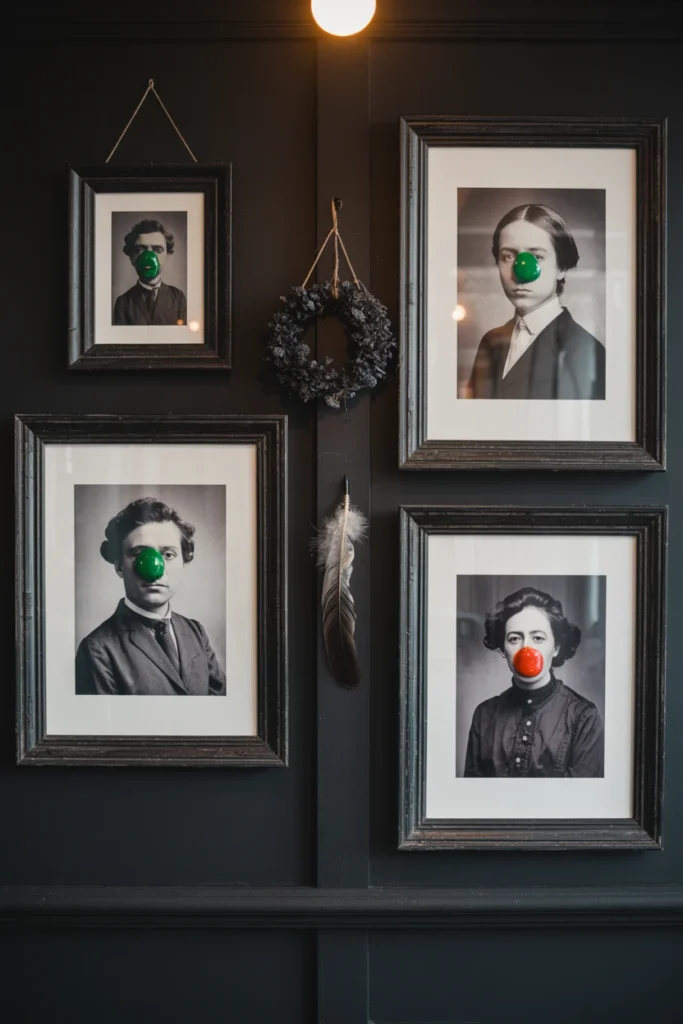
Bare walls left unchanged during Halloween season create the most immediately visible gap in the display — the everyday art and photos that live on those walls actively undermine the atmosphere built by every other halloween diy project in the room. Generic framed prints of landscapes or family photos break the haunted narrative completely regardless of how strong the surrounding decor is. Free printable Victorian-era portrait art costs exactly zero dollars and installs in existing frames in under five minutes per piece.
Search “free printable creepy Victorian portraits” on Pinterest or Etsy — dozens of high-resolution free downloads are available — and print on standard 8.5×11 inch paper at full resolution on any home printer. Remove existing art from frames already hanging on the wall and replace with the printed portraits — zero new nail holes, zero new frames, zero wall damage of any kind. After printing, add one small drop of bright green or red acrylic paint to each portrait’s eyes and allow to dry before framing — the raised paint texture creates a three-dimensional glowing eye effect that reads as genuinely unsettling from across the room.
| Frame Size on Hand | Portrait Print Size | Best Arrangement Role |
| 5×7 inch | Standard 5×7 inch print | Gallery grouping filler |
| 8×10 inch | 8×10 inch full-page print | Solo statement placement |
| 11×14 inch | Scaled print from office store | Dominant wall anchor |
| 4×6 inch | Cropped portrait section | Small gallery filler piece |
Halloween DIY Styling and Finishing Touches for a Cohesive Look
These three tips apply after all primary decor is placed. They are the difference between a display that looks assembled and one that looks finished — and they cost almost nothing to implement.
20. Apply Fake Cobwebs Strategically to Corners and Furniture Edges
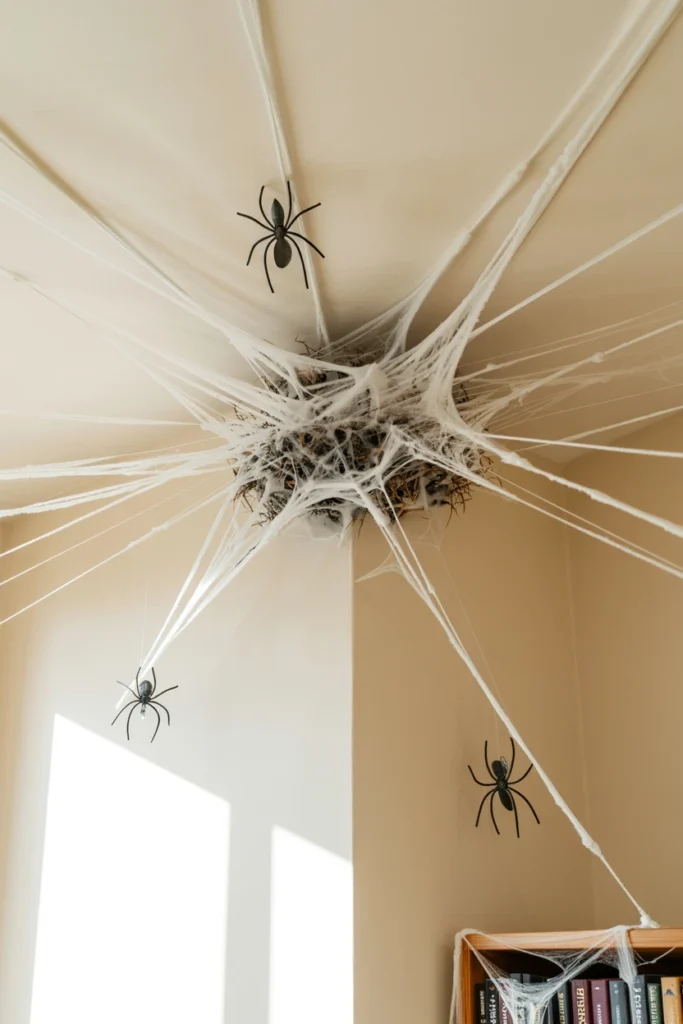
Fake cobwebs stretched thin and distributed equally across every surface produce the effect of a retail Halloween aisle rather than a haunted space. Uniform distribution signals deliberate artificial placement rather than organic growth. Strategic corner concentration creates the illusion that cobwebs grew outward from a source point — which reads as genuinely eerie rather than decorative.
Start each cobweb installation by pressing a thick cluster firmly into the upper corner where ceiling meets two walls, then pull individual strands outward and downward across the wall surface with 30–40% of each strand hanging free as a loose drape. Stretch each cobweb strand to 3–4 times its unpackaged size before pressing to the wall — overstretched cobwebs look exactly like authentic spider silk while unstretched packaged cobwebs look exactly like polyester fill. Place plastic spiders at the dense corner anchor cluster and at irregular intervals along each strand — never space spiders evenly, because even spacing reads as artificial placement from across the room.
| Cobweb Location | Material Amount | Spider Placement Count |
| Upper room corner (ceiling-wall junction) | 1/4 package of cobweb per corner | 3–5 spiders per corner |
| Furniture edge (bookshelf, mirror frame) | 1/8 package per furniture piece | 1–2 spiders per piece |
| Door frame (full perimeter) | 1/4 package per door | 4–6 spiders total |
| Window frame (interior) | 1/8 package per window | 2–3 spiders |
21. Layer Varying Heights Using Books, Boxes, and Pedestals
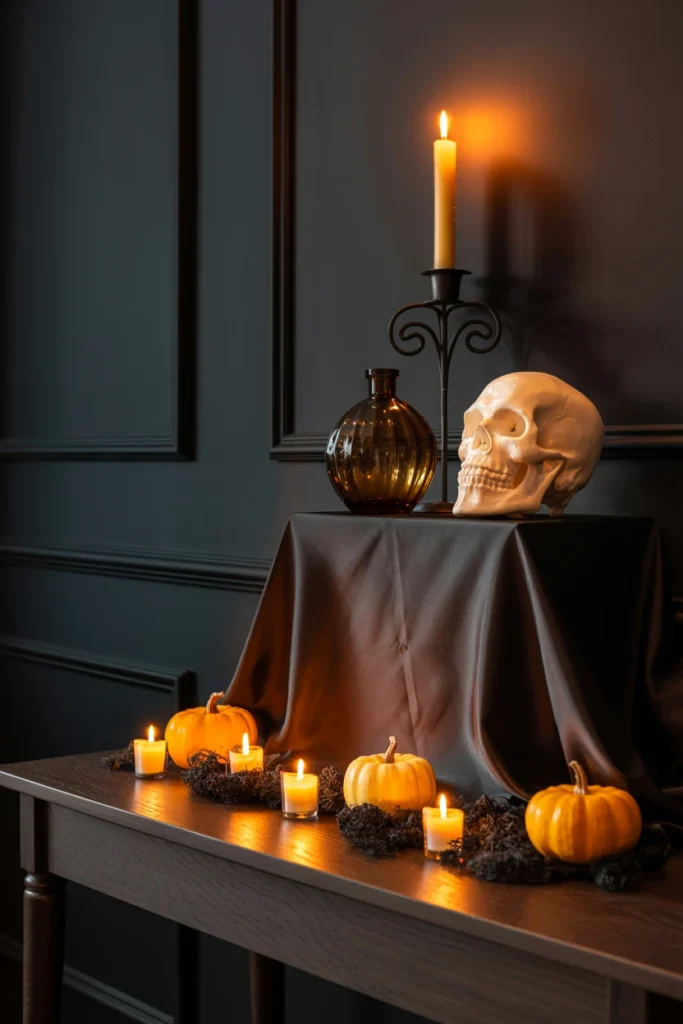
A display surface with all props at the same level reads as a retail shelf arrangement regardless of how compelling the individual objects are. Single-level arrangements eliminate the visual rhythm and shadow depth that make styled halloween decor displays feel intentional rather than laid out. Height variation of at least three distinct levels creates the depth, shadow play, and movement that a completely flat arrangement never achieves at any budget level.
Stack books or small cardboard boxes to the target riser height and drape a cut piece of black fabric over the entire stack — the riser becomes completely invisible and the prop placed on top appears to float at the elevated height with no visible support. Every halloween display surface needs a minimum height difference of 6 inches between its tallest and shortest elements to create visible depth and shadow from across the room. The three-level rule applies to every surface universally: low (0–4 inches above surface), mid (6–10 inches), and tall (12+ inches) — at least one object must occupy each level or the display reads as flat.
| Riser Height | DIY Method | Works Best Under |
| 2–4 inches | 2–3 stacked hardcover books | Small pumpkins, votive candles |
| 5–8 inches | Cardboard box wrapped in black fabric | Skulls, lanterns, large jars |
| 10–14 inches | Inverted terracotta pot under black cloth | Large skulls, tall taper candles |
| 16–20 inches | Wooden crate or double-stacked boxes | Single large statement piece only |
22. Use Black Ribbon to Unify Disparate Decor Elements
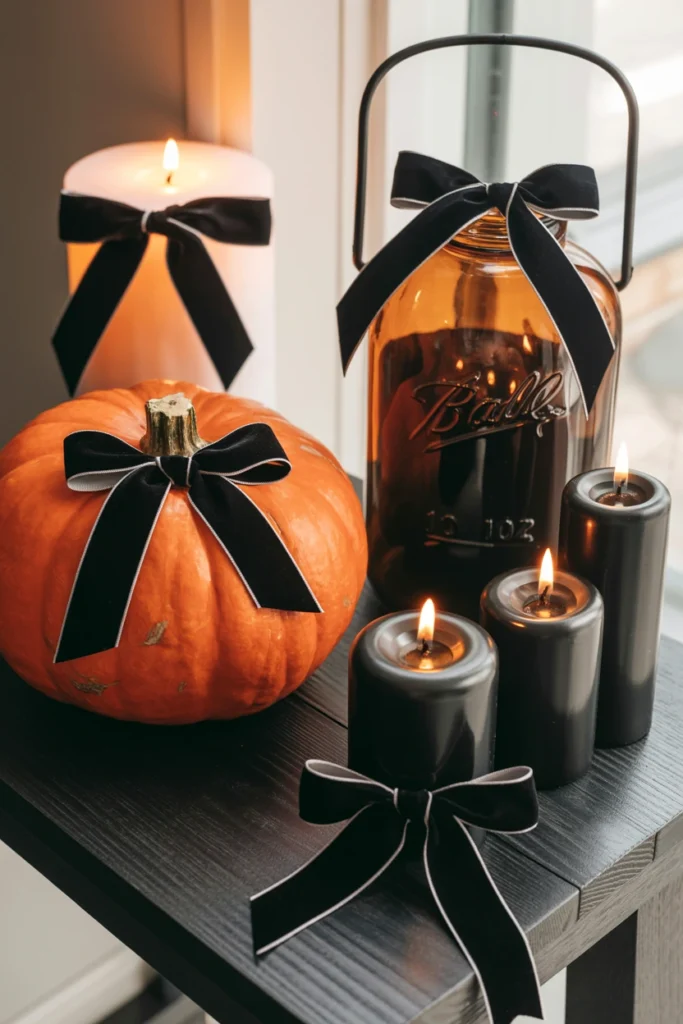
Halloween decorations sourced from different project sessions, different years, or different product lines look visually disconnected when placed in the same zone together. Visual disconnection between props makes an entire display read as randomly accumulated rather than deliberately curated. A single repeated black ribbon element tied consistently across every object in a display creates cohesion that ties every item into one unified visual language for under $6 in total material cost.
Tie a 12-inch cut of 1-inch wide black velvet ribbon in a simple bow around every cylindrical element in the display — pumpkins, mason jars, pillar candles, and lantern handles all take the identical bow in under 30 seconds each. The exact same bow tied consistently across every display element creates a visual rhythm that the eye reads as intentional design rather than coincidence. One 9-yard roll of 1-inch black velvet ribbon at $4–$6 provides enough material to unify 15–20 individual display elements across an entire decorated room.
| Ribbon Width | Best Application | Visual Result |
| 3/8 inch | Mini jars, taper candles, small twig bundles | Small, delicate bow — refined look |
| 5/8 inch | Standard pillar candles, small pumpkins | Medium balanced bow — versatile |
| 1 inch | Large pumpkins, lanterns, mason jars | Full statement bow — dominant accent |
| 1.5 inch | Large cauldrons, wreath centers, baskets | Oversized dramatic bow — maximum impact |
Storing and Maintaining Your Halloween DIY Decorations Long-Term
Handmade halloween decorations represent hours of skilled craft work. A proper storage system is what separates a one-year project from a multi-year investment that improves with every season.
23. Photograph Your Display Setup Before Packing Decorations Away
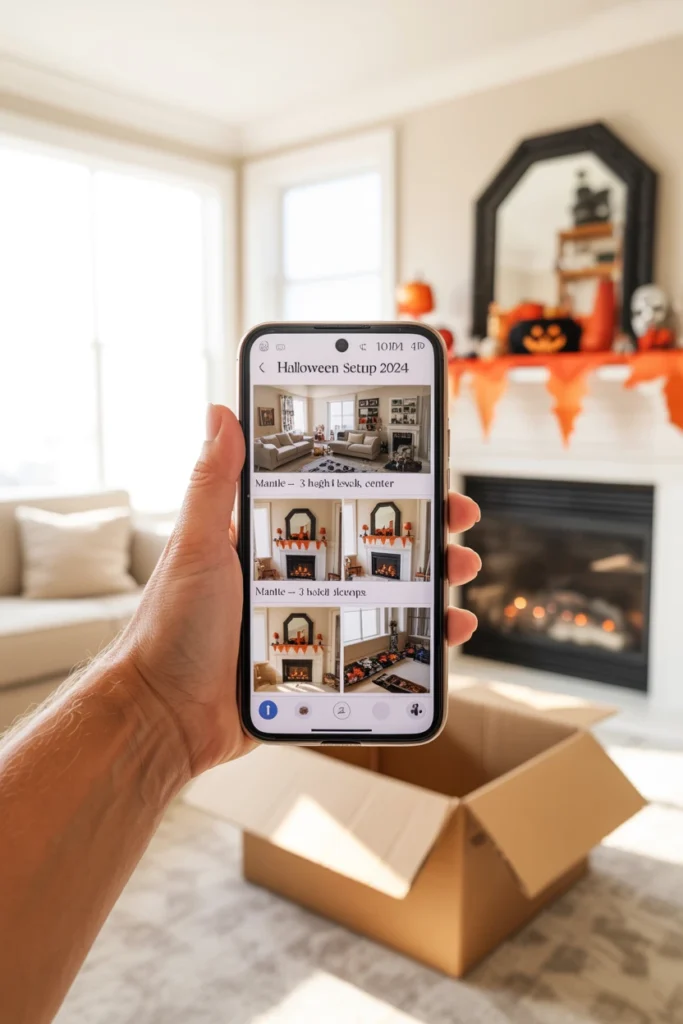
Dismantling a halloween display that took 4–6 hours to build without documentation means rebuilding it entirely from scratch the following year with no reference point. Without photos, the exact vignette arrangements, height levels, and zone placements that produced the finished effect are permanently and completely lost. A five-minute photo session on November 1st eliminates 3–4 hours of guesswork and rearranging in the following year and produces a better display every season that builds on the previous year’s best decisions.
Photograph each decor zone from the exact standing position you view it from during normal daily use — this captures the real visual experience rather than an overhead or wide angle that distorts proportions and misrepresents the actual effect. Take one full-width zone shot and one close-up of each vignette arrangement, then save all photos in a single album named “Halloween Setup [Year]” with one-line captions describing materials and any measurements that were critical to the arrangement. Add one photo of the full open storage bins before final packing so next year’s setup begins with a complete visual inventory.
| Photo Type | What It Captures | Most Useful For |
| Full-room wide shot | Zone distribution, color balance, overall scale | Recreating the opening visual atmosphere |
| Zone medium shot | Hero piece position and height levels | Rebuilding each individual zone |
| Vignette close-up | Item groupings, spacing, and riser positions | Getting fine arrangement details right |
| Open storage bin flat lay | All items used per zone before packing | Knowing exactly what to unpack and where |
24. Store Handmade Decor in Labeled Clear Bins by Category
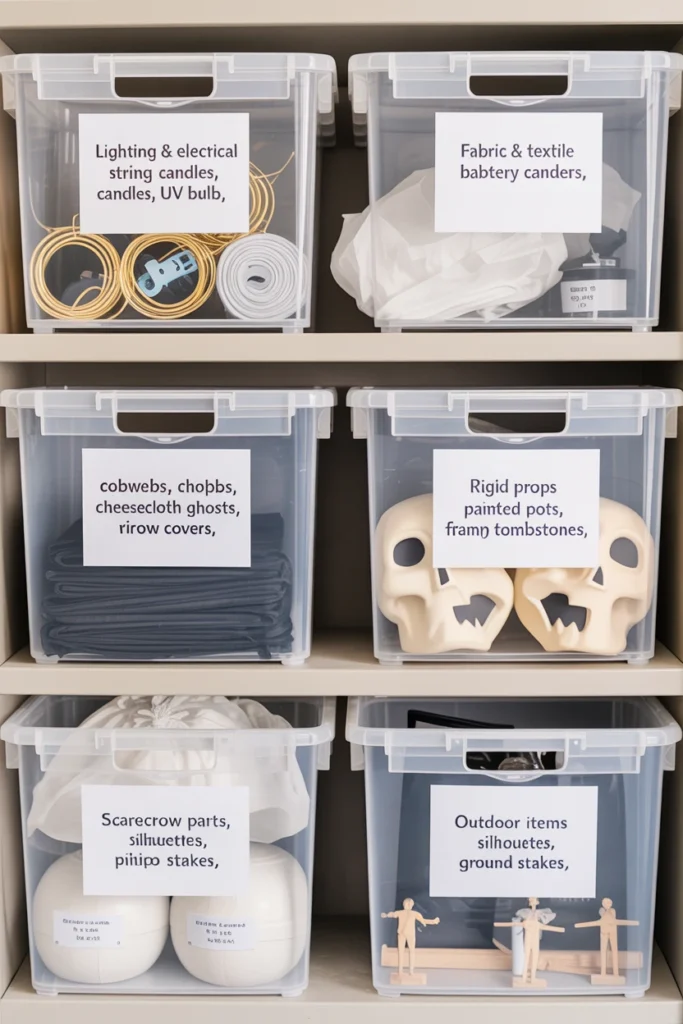
Handmade halloween decorations packed into opaque boxes without labeling arrive the following year as a complete mystery requiring full unpacking before any decision is possible. Crushed or damaged handmade items discovered during setup are impossible to repair or replace on short notice before the holiday. A category-based clear bin storage system provides immediate visual access to every stored item and cuts the annual setup time from 4 hours to under 90 minutes — the single highest-return investment in the entire halloween diy workflow.
Assign one clear plastic storage bin (12-gallon capacity minimum) per category: lighting and electrical, fabric and textile items, rigid props and skulls, and outdoor items. Wrap every handmade item individually in white tissue paper before placing in the bin — tissue paper prevents paint transfer between stored items and costs under $3 for a 30-sheet pack. Label each bin with both the category name and a full contents list printed on a 4×6 card and taped to the lid so the entire inventory is readable without opening a single bin.
| Storage Category | Category Contents | Special Handling Rule |
| Lighting and electrical | String lights, battery candles, UV bulbs | Coil string lights in figure-8 pattern to prevent tangles |
| Fabric and textile | Cheesecloth ghosts, cobwebs, ribbon, throw covers | Fold flat, white tissue paper between every layer |
| Rigid props | Skulls, painted pots, frames, foam tombstones | Wrap individually, store upright not stacked |
| Outdoor items | Scarecrow parts, silhouettes, ground stakes | Bag each item separately, label with its yard zone |
Common Halloween DIY Decor Mistakes That Ruin the Spooky Effect
Every one of the following errors has a direct and specific correction. Avoid all eight and the remaining tips produce their full intended effect.
| Mistake | Why It Hurts the Space | Better Alternative |
| Spreading props across every surface | Creates visual noise that cancels atmosphere and reads as clutter | Group all items into exactly 4 defined zones, leave every other surface clear |
| Using cool-white or daylight bulbs | White light flattens shadows and eliminates the mood that orange light creates | Replace with warm amber (2700K) or orange bulbs in all lamps used during display hours |
| Buying all props in one size | Single-height displays read as retail shelf arrangements | Use three distinct height levels — low (0–4 in), mid (6–10 in), tall (12+ in) — on every surface |
| Spreading budget thin across too many items | Low-density coverage makes every zone look underdecorated simultaneously | Invest fully in 4 zones only — ignore every other surface entirely |
| Mixing three or more color palettes | Competing colors create visual chaos that reads as unintentional | Limit strictly to dominant + accent + neutral — three colors maximum across all zones |
| Applying cobwebs directly from the package | Bunched unstretched cobwebs look exactly like polyester fill | Stretch each strand 3–4 times its packaged size before pressing to any surface |
| Placing outdoor props individually without grouping | Scattered single items disappear visually at 25-foot street distance | Build one dominant scene with 5+ items grouped — one strong cluster beats ten scattered props |
| Leaving year-round art and family photos on walls | Everyday imagery breaks the Halloween narrative completely | Swap every existing frame with Victorian portrait printables — zero new holes required |
Halloween DIY Decor by Space, Budget, and Living Situation
Small Apartment or Studio
A small apartment supports halloween decor diy effectively when every element works double duty as both a functional item and a visual prop. The core constraint is surface area — too many standalone props in a compact space creates claustrophobia rather than atmosphere, and the display collapses on itself.
Key strategies for small apartments:
- Replace one overhead bulb with a warm orange smart bulb to shift the entire room’s color temperature without consuming any surface or floor space.
- Designate one surface only — the coffee table or entry console — as the full display zone and keep every other surface completely clear.
- Use vertical wall space for bat swarms and window silhouettes so the decor lives above furniture rather than competing with it.
- Choose a tight 3-piece vignette (one tall, one medium, one low item) for the single styled surface rather than spreading items across multiple locations.
- Hang one large cheesecloth ghost from a ceiling hook at a corner to add dramatic height with zero floor or surface footprint.
- Use black ribbon to transform functional everyday items already in the apartment — candles, wine glasses, vases — into Halloween props without purchasing replacements.
Outdoor Front Yard Display
Outdoor halloween diy decorations must work at 25–30 feet of street-level viewing distance in full daylight and after dark. The core constraint is scale — props sized for indoor use are completely invisible from the sidewalk and waste the most visible display space in the entire halloween setup.
Key strategies for front yard displays:
- Build one dominant scene — graveyard cluster, witch’s workspace, or haunted path — rather than scattering individual props across the full yard.
- Use ground-stake solar or battery uplighting to illuminate props from below after dark, creating shadow drama that overhead lighting physically cannot produce.
- Size all front-row props at a minimum 18-inch height — anything under 12 inches reads as ground-level invisible from the street.
- Anchor the entire outdoor display with one large-scale element: a full tombstone graveyard cluster of 7+, a 6-foot scarecrow, or a lit arch frame over the walkway.
- Line the walkway with battery-lit carved pumpkins every 4 feet to create a navigable illuminated path that guides visitors and creates consistent ambient light across the full yard.
- Route all extension cords along the house foundation rather than crossing the lawn — foundation routing prevents cord damage and eliminates trip hazards along the approach path.
Rental Property (No Permanent Changes)
Rental halloween diy decor requires zero wall damage, zero adhesive residue on surfaces, and zero items requiring drilling or permanent attachment of any kind. The core constraint is full reversibility — every element must be removable in under 30 minutes on move-out day with no visible evidence of its presence.
Key strategies for rentals:
- Use 3M Command strips rated for the specific prop weight — 4-pound-rated strips support virtually all wall silhouettes, bat swarms, and lightweight frames without wall damage.
- Apply static-cling window film or window clings to glass surfaces instead of any tape-attached cardboard cutout for zero-residue window decoration.
- Use spring tension curtain rods inside window frames to hang sheer panels with threaded string lights — no wall contact, no drilling, no damage.
- Choose freestanding floor props — a black cauldron, a hay bale arrangement, a decorative ladder display — that require no attachment to any fixed surface.
- Drape black or dark fabric over furniture surfaces rather than replacing or reupholstering — fabric draping completely reverses in under 5 minutes per piece.
- Concentrate all effort into the dining table centerpiece and one console table zone where zero wall contact is required at any point in setup or removal.
Under-$20 Total Budget
A $20 total budget forces ruthless prioritization of the two or three highest-impact changes that transform a space the most per dollar spent. The core constraint is eliminating every purchase that is visible but not transformative — if an item does not change the room’s atmosphere measurably, it does not qualify for a $20 budget.
Key strategies for under-$20:
- Allocate $8–$10 to orange LED string lights first — lighting changes the entire room atmosphere and delivers more transformation per dollar than any physical prop at any price.
- Cut bat swarms from black construction paper or card stock (under $2 for a 50-sheet pack) using free bat templates from Pinterest — 30 bats cost under $2 in total.
- Print Victorian portrait art for free on a home printer and install in existing frames already on walls — total new cost is the ink alone, effectively $0.
- Spend $4–$6 on one roll of 1-inch black velvet ribbon and use it to transform pumpkins, mason jars, and candles already in the home into coordinated halloween props.
- Collect fallen dead branches outdoors, spray-paint them flat black using $2–$3 of remaining budget, and arrange in an existing vase as a bare haunted tree centerpiece.
- Mix food coloring ($2–$3 total) into Mod Podge already in the craft supplies and transform mason jars into a full glowing potion bottle cluster for the kitchen counter or console table.
Frequently Asked Questions
What is the easiest halloween decor diy project to start with?
The bat swarm wall installation is the easiest entry point for halloween decor diy — it requires only black felt sheets, scissors, and removable adhesive dots. Cut 25–30 bats from felt in under 30 minutes, fold each body crease slightly upward, and arrange in an ascending corner swarm. Total cost is under $5, total installation time is under 45 minutes, and total removal is under 10 minutes with no wall damage.
What mistakes should I avoid when making halloween diy decorations?
The most damaging mistake in homemade halloween decorations is distributing props equally across every surface instead of concentrating them in four defined zones. Equal distribution creates visual noise that cancels atmosphere and makes every individual diy halloween craft read as filler rather than a deliberate design choice. The second most common error is applying cobwebs directly from the package without stretching — always pull each strand 3–4 times its packaged length before pressing to any surface.
How do I make halloween decorations at home with no budget?
Zero-budget halloween decor diy focuses on three free material sources: cardboard from the recycling bin, old fabric from closets, and portrait art printed on standard paper. Cut tombstone shapes from cardboard boxes and paint with any dark paint available, hang old white sheets from tree branches as ghost figures, and tape printed Victorian silhouettes inside lit windows for a complete display that costs nothing in new materials.
How can I do halloween decor diy in a small apartment?
Small apartment halloween diy produces its strongest result when concentrated into one styled zone rather than spread across the entire living space. Choose the coffee table or entry console as the single display zone, use vertical wall and window space for flat elements like bat swarms and silhouettes, and replace one lamp bulb with an orange or amber option to shift the entire room’s atmosphere without occupying any floor or surface space.
Should I make indoor or outdoor halloween diy decorations first?
Start with outdoor halloween diy decorations first — outdoor elements are visible to the widest audience and establish the scale, color weight, and dominant theme that all indoor decor must then reinforce. A strong outdoor anchor — one graveyard scene, a lit walkway of carved pumpkins, and window silhouettes visible from the street — creates a coherent narrative that every indoor project builds on. Indoor decor planned before outdoor decisions locks in the wrong scale and color balance.
How often should I replace my homemade halloween decorations?
Quality handmade halloween decorations made with fabric stiffener, spray paint, and wire frames last 4–6 years before materials degrade noticeably when stored correctly in labeled clear bins. Cheesecloth ghosts, felt bat swarms, and painted foam tombstones stored dry and away from heat last indefinitely with no scheduled replacement cycle. Paper-based decorations — printed Victorian portraits and cardboard silhouettes — replace annually because the material cost is under $2 per piece and print resolution improves with every new version.
Does halloween decor diy work for front porches and yards?
Halloween decor diy works extremely effectively for front porches and yards when every project is built to a scale that reads at 25–30 feet of street-level viewing distance. Outdoor diy halloween decorations need a minimum 18-inch height for all ground-level props and at least one anchor element exceeding 36 inches to register visibly from the sidewalk. The graveyard cluster, hanging cheesecloth ghost, and stuffed scarecrow projects in this guide are all specifically calibrated for outdoor viewing distance — not tabletop scale.
How much does it cost to make your own halloween decorations?
A complete halloween diy decoration setup covering four defined display zones costs $20–$60 in new materials when existing household items are incorporated into the supply inventory. The highest-cost single categories are dry ice for fog effects ($8–$15 per session), battery-operated flickering candles ($4–$8 each), and UV black light bulbs ($8–$12 each). The lowest-cost projects — bat swarms, window silhouettes, and printed potion jar labels — cost under $3 total in new materials and deliver some of the highest visual impact per dollar of any project in this guide.
How do I store homemade halloween decorations so they last?
Store all handmade halloween decorations in clear labeled bins divided into four categories: lighting and electrical, fabric items, rigid props, and outdoor items. Wrap every individual handmade piece in white tissue paper before placing in the bin — tissue paper prevents paint transfer between stored items and costs $3 per 30-sheet pack. Photograph the complete display on November 1st before dismantling so zone arrangements, vignette heights, and prop groupings are fully documented for next year’s setup.
Conclusion
Halloween decor DIY transforms any space into a genuinely atmospheric haunted display when you work from a defined three-color palette, zone your placement deliberately across four targeted areas, and treat lighting as the foundation rather than an afterthought. Start with Tip 1 — define your color palette — before you buy, make, or move a single thing. Right now, walk your home and identify your four display zones so every project in this guide has a designated destination before the first piece of felt is cut or the first jar is painted.
A great halloween display is not built in one session — it is layered over days as individual projects cure, dry, and find their correct position within the overall scheme. The homes that produce the strongest, most cohesive halloween atmosphere every year are the ones where every element was planned before any material was purchased, where lighting was installed first, and where storage was treated as the final step that makes next year’s display better than this one.
Halloween decor DIY instantly converts any ordinary room into a cohesive, layered haunted display that store-bought kits never replicate. Handmade decorations add texture, scale, and intentionality that mass-produced props physically cannot deliver. This guide gives you 24 specific, actionable projects — from outdoor graveyard scenes to indoor vignettes — with exact materials, measurements, and placement rules for every one. Start with the three foundation steps before you touch a single craft supply.